A Few Questions Answered
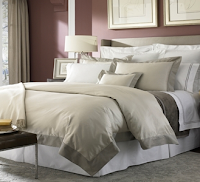
Friday, April 08, 2011For those of you with a king sized bed. I would suggest buying an extra flat sheet or coordinating colored fabric and adding a flat border around the edges of the duvet. I would also suggest connecting the additional border fabric to the backing of the duvet like so.
A few images I like...
A ruched trim before adding the extra border. How about a little ruffle or just clean and simple. I think a border can add even more dimension and style to this type of duvet.
* Images Bella Notte, Peacock Alley
Hopefully this image with help clarify were the pintucks go and why I added the 5" squares to the center of the 10" squares. You could just mark the pintuck positions with dots but the lines and boxes were helpful to me so that I could keep everything lined up straight. If you decide to use the template method like I did I used all the line on the grid to line my template up to making it very visually easy to everything square.

Hopefully this was helpful and I answered all of your questions.
xoxo,


3 comments
Great tutorial. This looks lovely. I'm excited to try it on a smaller project first.
ReplyDeleteThank you for your wonderful tutorial. I have a question. Did you take the duvet apart to do all the work or did you keep it assembled? I'd like to keep it together if possible, but I am imagining it being tricky having to always manage the bottom side of the duvet.
ReplyDeleteThanks!
Melissa
Missy, I did not take the duvet apart. It was a little tricky to move the fabric around but what can I say I'm lazy and the thought of unpicking and re-sewing in addition to everything else was just to much for me. Good Luck.
ReplyDelete